Project Info
This project did not submit a demo video on Devpost.
Inspiration
Vaishnavi came up with the idea of creating a food nutrition app that would scan ingredient lists on product labels and return a summary of whether or not the user can eat that product based on their diet restrictions. Shirley added onto this idea by proposing the medical element of the app: checking whether or not that product contains ingredients that may negatively interact with their medication. Shirley came up with that idea due to her experience with taking antibiotics once. She had forgotten to ask the pharmacist if she could drink coffee while taking the antibiotic. We also wanted to target senior citizens as a demographic for app, going off our experiences with our grandparents and their difficulty in remembering food-drug interactions for their medication. We created a user friendly and intuitive app, keeping the target market in mind.
What it does
mendwell allows users to enter their medications upon account creation, which can later be modified in the user's dashboard. According to the user's medications, mendwell can indicate whether a food item is safe or unsafe to consume on the basis of food-drug interactions. For instance, if a user is prescribed atorvastatin for their elevated blood pressure, they would need to avoid certain food items, such as grapefruit, to ensure the efficacy of the medication and prevent side effects. If a user is unsure of whether a food item may conflict with their medication, all they would have to do is scan the food label or item with your camera, and mendwell will analyze whether the item is safe to eat or not. Once the analysis is done, mendwell will provide a comprehensive summary of the food-drug interactions by showing a list of the ingredients and medications that conflict. It will also provide more information about the medication upon the user’s request.
How we built it
We built mendwell using React Native, Tesseract OCR, Node.js, and the native libraries for iOS. In addition to these technologies, we used Figma for creating detailed workflows in the planning process of our application.
Challenges we ran into
We ran into so many challenges while building this application. One of our biggest challenges was figuring out React Native and the iOS build process. Since we are beginners to native applications and have a stronger base in web applications, configuring React Native to build the application on our phones was the hardest part. In addition, we learned that one of the APIs we planned to use for food-drug interaction is not a public API, even though it seemed like one. We did not have enough time to contact the API provider for the key, thus we needed to pivot quickly. Another challenge we faced was configuring the Tesseract OCR for our React Native application. Tesseract OCR does have wrapper code for JavaScript and after thorough research, we had seen that it worked for others using React Native. However, we severely underestimated how much our lack of React Native knowledge will interfere with the Tesseract OCR, and unfortunately, we were not able to set it up in time.
Accomplishments we're proud of
Despite not having a fully working project, we hit many great milestones throughout the project. Not only were we able to complete all of the screens for our UI, but we were also able to get the built-in camera working for our application, which is a great accomplishment based on how much time we’ve spent to make it work. Overall, we are very proud of our idea and the effort we’ve put through the last 36 hours, and we believe that our application has full potential to scale!
What we learned
Throughout this project, we faced a lot of challenges and as a result, we learned how to pivot quickly to avoid wasting time. For example, when we learned that the DrugBank API we were planning to use did not provide public API key, we pivoted quickly to generating mock data using ChatGPT in order to simulate various food-drug interactions for specific medications. Had we spent more time trying to figure out this issue, we would have not been able to finish building our UI screens and our Tesseract OCR connection. Another important thing that we learned is to always check whether the open-source applications we are using are up-to-date. We faced a lot of compatibility issues in the Expo client in our React Native app as well the tamagui React-Native framework. If we used containerization to deal with the discrepancies in our tools’ versions, the building process may have been a little easier for us.
What's next
We plan to build and release our application for the Android and iOS App Store. Once that is done, we are hoping to build a startup focusing on this application and potentially partner with hospitals to not only gather the user’s medication information, but also to have them outsource their patients to mendwell. In addition, we would like to integrate mendwell with existing nutrition and allergy applications, such as fig, which will help us build a customer base that we can eventually launch to market with.
hackpack-react-native
Overview
In this hackpack we will go over the basics of React Native and Expo to build a simple mobile application. React Native is a framework that allows you to build native mobile applications using JavaScript and React. Expo is a toolchain built around React Native that allows you to easily build, run, and deploy React Native applications. Expo also provides a number of APIs that allow you to access native device functionality such as the camera, accelerometer, and location.
Setup
- Install Node.js and npm
- Node.js is a JavaScript runtime that allows you to run JavaScript outside of the browser. npm is a package manager for JavaScript that allows you to easily install and manage JavaScript libraries.
- You can download Node.js and npm here.
- To check if you have Node.js and npm installed, run the following commands in your terminal:
node -v npm -v - For this hackpack, we will be using Node.js version 16.19.1 and npm version 9.6.7.
- Install Expo CLI
- Expo CLI is a command line tool that allows you to easily build, run, and deploy React Native applications.
- To install Expo CLI, run the following command in your terminal:
npm install -g expo-cli - To install Expo SDK, which is a collection of libraries that provide access to native device functionality, run the following command in your terminal (we'll be using version 48 for this hackpack)
npm install expo@48 -g
Note: You may find that newer packages may have less support across the community libraries and may not be compatible with the latest version of Node.js. If you run into any issues, try using an older version.
Creating a New Project
-
To create a new project, run the following command in your terminal:
npx create-expo-app my-appThis will create a new directory called my-project with all the files you need to get started.
-
To run the application, run the following command in your terminal:
cd my-app
npm start
With Expo, you can directly run your application on your phone. To do so, download the Expo app on your phone. Once you have the Expo app, you can scan the QR code that appears in your terminal. Alternatively, you can press 'a' in your terminal to run the application in an Android emulator (instructions) or 'i' to run the application in an iOS simulator (instructions).
Notes: There will be several additional files in the my-project directory that tell Expo how to build and run your application. You can ignore these files for now.
Hello World
- Open the App.js file in your text editor of choice. You should see the following code:
import { StatusBar } from 'expo-status-bar';
import React from 'react';
import { StyleSheet, Text, View } from 'react-native';

export default function App() {
  return (
    <View style={styles.container}>
      <Text>Open up App.js to start working on your app!</Text>
      <StatusBar style='auto' />
    </View>
  );
}

const styles = StyleSheet.create({
  container: {
    flex: 1,
    backgroundColor: '#fff',
    alignItems: 'center',
    justifyContent: 'center',
  },
});
- Replace the Text component with the following:
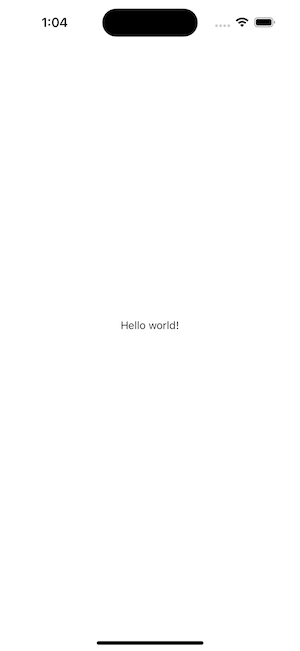
<Text>Hello World!</Text> - You should see the text "Hello World!" appear in the Expo app on your phone or emulator through live reloading.
Styling
It's a little bland right now. Let's add some styling to make it look a little nicer.
- First, let's take a look at the following code:
const styles = StyleSheet.create({
  container: {
    flex: 1,
    backgroundColor: '#fff',
    alignItems: 'center',
    justifyContent: 'center',
  },
});
The styles object contains a number of properties that describe how a component should be styled. Each property contains a number of key-value pairs. The key is the name of the style property aka the class, and the value is the value of the style property. For example, the backgroundColor property sets the background color of the component. The value of the backgroundColor property is '#fff', which is a hex code that represents white. Notice how these properties are camelCased versions of CSS properties.
- Let's change the background color of the container to blue. Change the backgroundColor property to '#0000ff'. You should see the background color of the container change to blue.
Notes: Flexbox is a layout system that allows you to easily position elements in a container. The flex property specifies how much space an element should take up relative to other elements in the container. The alignItems property specifies how to align elements along the cross axis. The justifyContent property specifies how to align elements along the main axis. Here is a guide that goes over the basics of flexbox.
Components
- Now let's create a component in a new
components/folder namedbutton.component.jsx. These are like lego blocks that you can use to build your application. Let's create a button component.
import { TouchableOpacity, Text } from 'react-native';

const Button = () => {
  return (
    <TouchableOpacity onPress={() => console.log('Button Pressed!')}>
      <Text>Click Me!</Text>
    </TouchableOpacity>
  );
};

export default Button;
- Export the Button component from App.js and import it into App.js. You should see the button appear in the Expo app on your phone or emulator.
export default function App() {
  return (
    <View style={styles.container}>
      <Text>Hello world!</Text>
      <Button />
      <StatusBar style='auto' />
    </View>
  );
}
- Although, the button works, we can't customize it as there are no properties that we can pass into the component. Let's some props, namely title, onPress, and style. This will allow us to dynamically change the title, onPress function, and style of the button.
const Button = (props) => {
  return (
    <TouchableOpacity
      onPress={props.onPress}
      style={props.style}>
      <Text>{props.title}</Text>
    </TouchableOpacity>
  );
};
- Now, we can customize the button in App.js.
export default function App() {
  return (
    <View style={styles.container}>
      <Text>Hello world!</Text>
      <Button
        title='Click Me!'
        onPress={() => console.log('Button Pressed!')}
        style={styles.button}
      />
      <StatusBar style='auto' />
    </View>
  );
}

const styles = StyleSheet.create({
  container: {
    flex: 1,
    backgroundColor: '#fff',
    alignItems: 'center',
    justifyContent: 'center',
  },
  button: {
    backgroundColor: '#ccc',
    padding: 10,
    borderRadius: 15,
    margin: 10,
  },
});
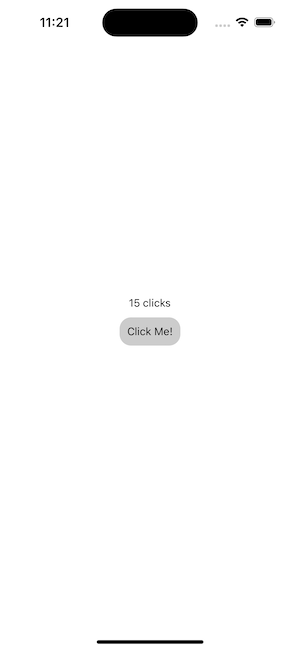
- Now, let's make a counter that tracks the number of times the button is pressed. First, let's create a state variable, count, using the useState hook and display that in the text component. The useState hook takes in an initial value and returns a state variable and a function to update the state variable. We can use the state variable to keep track of the count and the function to update the count. Whenever, a state is updated, the component is re-rendered, meaning that the component is rendered again with the updated state.
// Add this import
import { useState } from 'react';

export default function App() {
  const [count, setCount] = useState(0);

  return (
    <View style={styles.container}>
      <Text>{count} clicks</Text>
      <Button
        title='Click Me!'
        onPress={() => {
          setCount(count + 1);
          console.log('Button Pressed!');
        }}
        style={styles.button}
      />
      <StatusBar style='auto' />
    </View>
  );
}
Screens
- Now that we have a component, let's move on to screens. Screens are components that are like pages in a website. We can use the Button component that we created earlier in a screen. We can manage screens and navigating between them using React Navigation. Let's install React Navigation.
npm install @react-navigation/native @react-navigation/native-stack
- Now, let's create a new screen in a new
screens/folder namedhome.screen.jsx. This will be the home screen of our app. Let's create a home screen component. Note, that we are using the StatusBar component from Expo to set the status bar style (light or dark) so that it is visible on the screen.
import { View, Text, StyleSheet } from 'react-native';
import { StatusBar } from 'expo-status-bar';

const HomeScreen = () => {
  return (
    <View style={styles.container}>
      <Text>Home Screen</Text>
      <StatusBar style='auto' />
    </View>
  );
};

export default HomeScreen;

const styles = StyleSheet.create({
  // Styles
});
- In App.js, let's define the navigation stack. The navigation stack is a stack of screens that we can navigate between. We can use the createStackNavigator function to create a stack navigator. The createStackNavigator function takes in a configuration object that contains the screens in the stack. We can use the component property to specify the component to render for each screen. We can also use the options property to specify the title of the screen.
import { NavigationContainer } from '@react-navigation/native';
import { createNativeStackNavigator } from '@react-navigation/native-stack';

// Add this import
import HomeScreen from './screens/home.screen';

const Stack = createNativeStackNavigator();

export default function App() {
  return (
    <NavigationContainer>
      <Stack.Navigator>
        <Stack.Screen
          name='Home'
          component={HomeScreen}
          options={{ title: 'Home' }}
        />
      </Stack.Navigator>
    </NavigationContainer>
  );
}
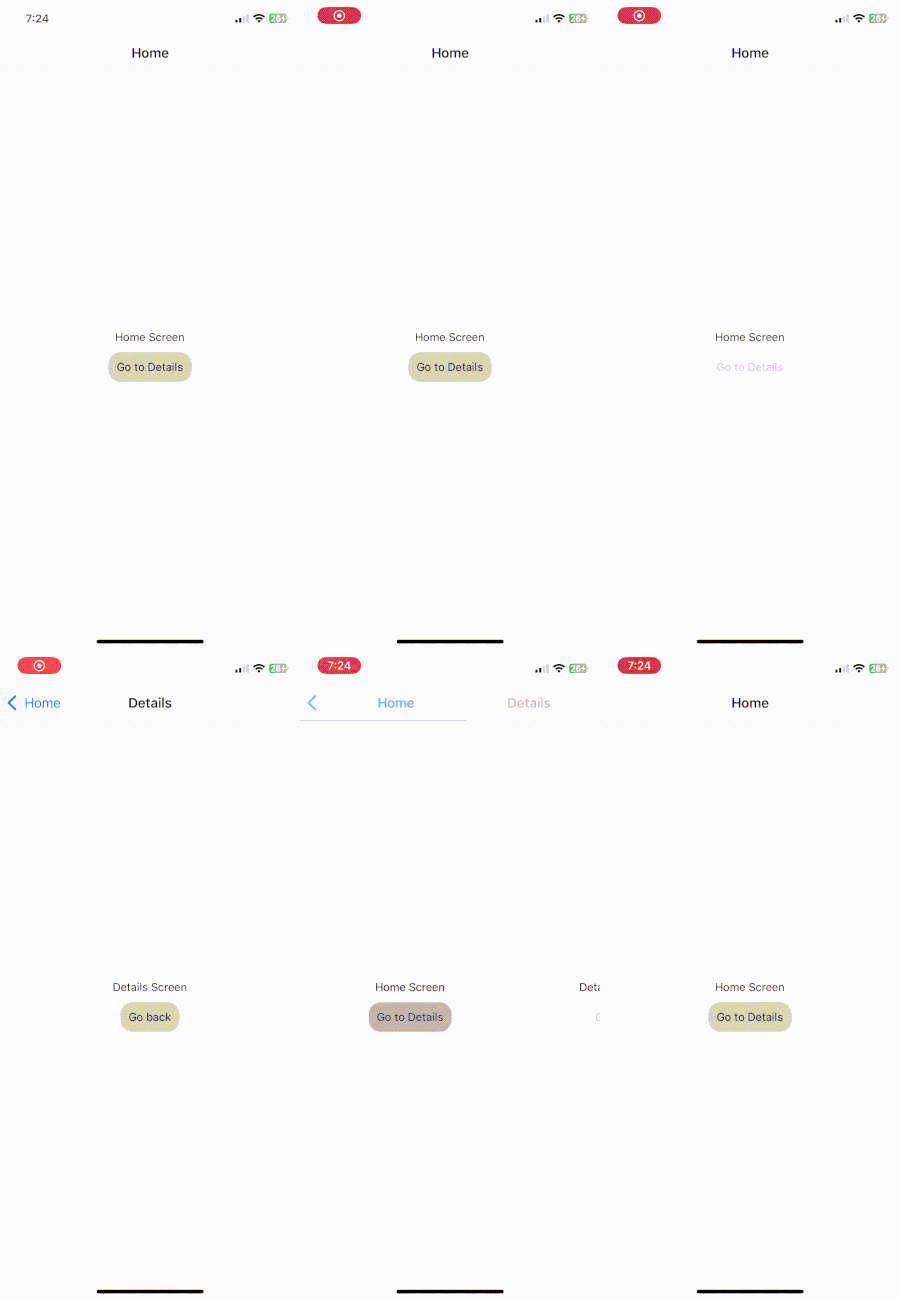
- We can also add a button to the home screen. Let's add a button to the home screen. Notice that we can pass in the navigation prop to the component. This allows us to navigate to other screens. We can use the navigate function to navigate to a screen. The navigate function takes in the name of the screen to navigate to, as defined in the createStackNavigator function. In this case, we can navigate to the Details screen by passing in 'Details' as the first argument to the navigate function.
import { View, Text, StyleSheet } from 'react-native';

import Button from '../components/button.component';

const HomeScreen = ({ navigation }) => {
  return (
    <View style={styles.container}>
      <Text>Home Screen</Text>
      <Button
        title='Go to Details'
        onPress={() => navigation.navigate('Details')}
        style={styles.button}
      />
    </View>
  );
};
- Now, let's create a details screen. Let's create a new screen in a new
screens/folder nameddetails.screen.jsx. This will be the details screen of our app. Let's create a details screen component.
import { View, Text, StyleSheet } from 'react-native';

const DetailsScreen = () => {
  return (
    <View style={styles.container}>
      <Text>Details Screen</Text>
    </View>
  );
};

export default DetailsScreen;

const styles = StyleSheet.create({
  // Styles
});
- In App.js, let's add the Details screen to the navigation stack and define the initial route to be the Home screen. Make sure to reload the app to update the navigation stack.
import DetailsScreen from './screens/details.screen';

const Stack = createNativeStackNavigator();

export default function App() {
  return (
    <NavigationContainer>
      <Stack.Navigator initialRouteName='Home'>
        <Stack.Screen
          name='Home'
          component={HomeScreen}
          options={{ title: 'Home' }}
        />
        <Stack.Screen
          name='Details'
          component={DetailsScreen}
          options={{ title: 'Details' }}
        />
      </Stack.Navigator>
    </NavigationContainer>
  );
}
- Now, we can navigate between the home screen and the details screen. However, we want to be able to go back to the home screen from the details screen. We can do this by adding a button to the details screen.
import Button from '../components/button.component';

const DetailsScreen = ({ navigation }) => {
  return (
    <View style={styles.container}>
      <Text>Details Screen</Text>
      <Button
        title='Go back'
        onPress={() => navigation.goBack()}
        style={styles.button}
      />
    </View>
  );
};
Lists
- Now, let's create a list of items. Let's create a new component in a called
list-item.component.jsx. This will be the list item component of our app. Let's create a list item component.
import { View, Text, StyleSheet } from 'react-native';

const ListItem = ({ title }) => {
  return (
    <View style={styles.container}>
      <Text>{title}</Text>
    </View>
  );
};

export default ListItem;

const styles = StyleSheet.create({
  // Styles
});
- Now, let's use the list item component in the home screen. Let's create a list of items and map over the list to render the list items. Note, that we are using the key prop to specify a unique key for each list item. This is required by React to keep track of the list items.
import ListItem from '../components/list-item.component';

const HomeScreen = ({ navigation }) => {
  const list = ['Item 1', 'Item 2', 'Item 3'];

  return (
    <View style={styles.container}>
      <Text>Home Screen</Text>
      {list.map((item, index) => (
        <ListItem
          title={item}
          key={index}
        />
      ))}
    </View>
  );
};
- What if the
ListItemis too large to fit on the screen? We can use theFlatlistcomponent to render a list of items. TheFlatlistcomponent takes in a configuration object that contains the list of items to render. We can use the data property to specify the list of items to render. We can also use the renderItem property to specify the component to render for each item. We can also use the keyExtractor property to specify a unique key for each item.
import { FlatList } from 'react-native';

const HomeScreen = ({ navigation }) => {
  const list = ['Item 1', 'Item 2', 'Item 3'];

  return (
    <View style={styles.container}>
      <Text>Home Screen</Text>
      <FlatList
        data={list}
        renderItem={({ item }) => <ListItem title={item} />}
        keyExtractor={(item, index) => index.toString()}
      />
    </View>
  );
};
Networking
- Now, let's fetch data from a server. Let's create a new component called
post.component.jsxto display a post.
import { View, Text, StyleSheet } from 'react-native';

const Post = ({ title, body }) => {
  return (
    <View style={styles.container}>
      <Text>{title}</Text>
      <Text>{body}</Text>
    </View>
  );
};

export default Post;

const styles = StyleSheet.create({
  // Styles
});
- Now, let's use the post component in the home screen. Let's fetch posts from the JSON Placeholder API. We can use the
fetchfunction to fetch data from a server. We can use thethenfunction to get the response from the server. We can use thejsonfunction to convert the response to a JSON object. We can use thecatchfunction to catch any errors. Note, that we are using theuseEffecthook to fetch the data when the component mounts.useEffectis used to perform side effects in a component, in other words, react to changes in the component through states or props.
import { useState, useEffect } from 'react';

import Post from '../components/post.component';

const HomeScreen = ({ navigation }) => {
  const [posts, setPosts] = useState([]);

  useEffect(() => {
    fetch('https://jsonplaceholder.typicode.com/posts')
      .then((response) => response.json())
      .then((json) => setPosts(json))
      .catch((error) => console.error(error));
  }, []);

  return (
    <View style={styles.container}>
      <Text>Home Screen</Text>
      <FlatList
        data={posts}
        renderItem={({ item }) => <Post title={item.title} body={item.body} />}
        keyExtractor={(item) => item.id.toString()}
        style={styles.flatlist}
        contentContainerStyle={styles.flatlistContent}
      />
    </View>
  );
};

const styles = StyleSheet.create({
  flatlist: {
    // Styles
  },
  flatlistContent: {
    // Styles
  },
});
Congratulations! 🎉
You've finished the react-native hackpack! Now, you can build your own react-native apps!
License
MIT
About HackPacks 🌲
HackPacks are built by the TreeHacks team and contributors to help hackers build great projects at our hackathon that happens every February at Stanford. We believe that everyone of every skill level can learn to make awesome things, and this is one way we help facilitate hacker culture. We open source our hackpacks (along with our internal tech) so everyone can learn from and use them! Feel free to use these at your own hackathons, workshops, and anything else that promotes building :)
If you're interested in attending TreeHacks, you can apply on our website during the application period.
You can follow us here on GitHub to see all the open source work we do (we love issues, contributions, and feedback of any kind!), and on Facebook, Twitter, and Instagram to see general updates from TreeHacks.
Analysis
View
Metric
- 3
- 2
- 1


Figures cover GitHub contributors during the hackathon window. A co-authored commit counts in full for each author, so per-member totals add up to more than the whole-team figures.
Technology
- JavaScriptIn code
- ReactIn code
- TypeScriptIn code
3 of 3 appear in the indexed code.
AI coding agents
No AI coding agent signals were found in this repository.
Detected from committed agent config files and commit authorship. Absence of a signal is not proof an agent was unused.
Codebase size
Source size
41 KB
Source files
18
Counts recognized source files only; vendored directories, binaries and lockfiles are excluded, so this is smaller than the repository on disk.
Repository
shirlsli/treehacks2024
35 files · 1.2 MB · @ 5e96f48
Structure
Interface
14 files · 40%Screens, components and styles rendered to the user.
Application logic
2 files · 6%Domain rules, services and shared utilities.
Data & schema
1 file · 3%Schema definitions, migrations and data access.
Supporting
Layers are inferred from where files sit in the tree, not from reading the code. A project that names its directories unconventionally will read oddly here — open the file browser to check anything the diagram implies.
Languages
- JavaScript56%
- Markdown42%
- TypeScript1%
Share of indexed source by file size. Binary and vendored files are excluded.
Dependencies
my-app/package.json
npm · 22- @expo-google-fonts/sora
- @expo/webpack-config
- @react-navigation/native
- @react-navigation/native-stack
- @tamagui/config
- @tamagui/core
- @tamagui/lucide-icons
- @types/react
- expo
- expo-camera
- expo-status-bar
- react
- react-dom
- react-native
- react-native-chip
- react-native-paper
- react-native-svg
- react-native-web
- +4 more
Declared in the repository’s manifests at the indexed commit. A declared package is not proof it is used, and runtime dependencies are listed first.
This project’s features have not been analysed yet.
Export this project's context (description, README, evidence, key source files) to chat with an AI agent elsewhere.